Skip to content

Blog

Debugging application with cross-GDB in Yocto environment

GDB is a very useful tool when debugging applications. Embedded devices lack sophisticated features that Development machines enjoy like better processor speed, huge RAM, etc. In such cases running GDB on the target will be painfully slow. But thanks to remote-debugging support from GDB which saves us from such situations. In this post we'll see how to do remote debugging of an application running on Raspberry Pi 3.

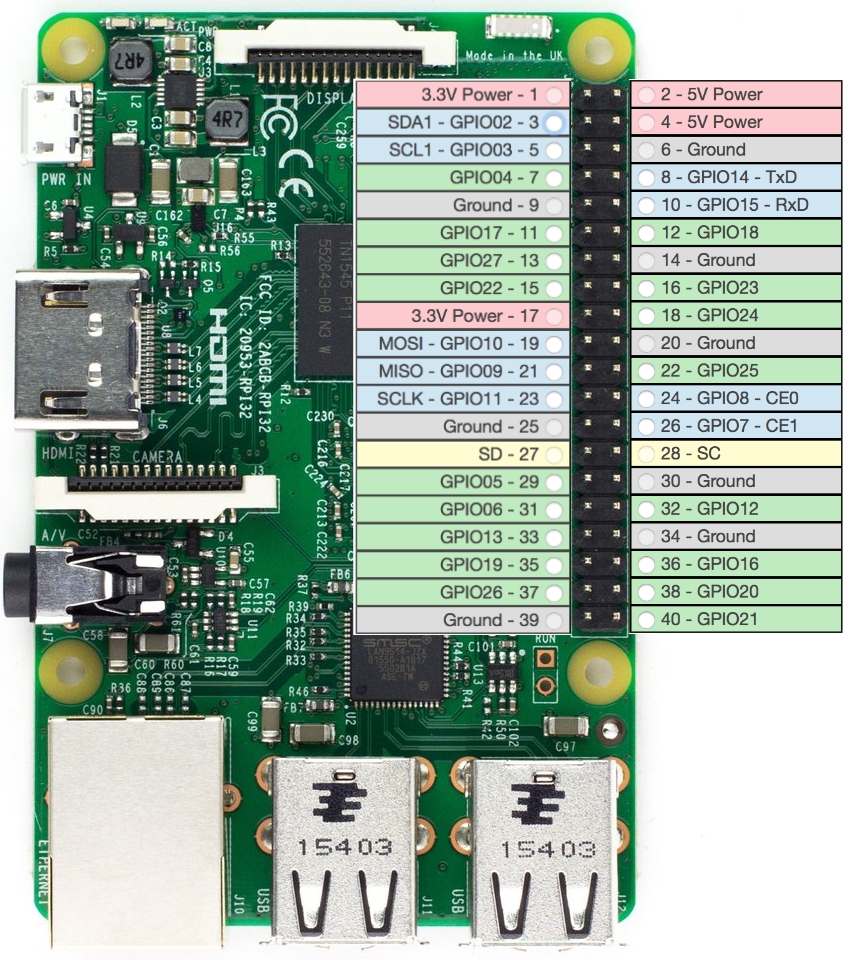
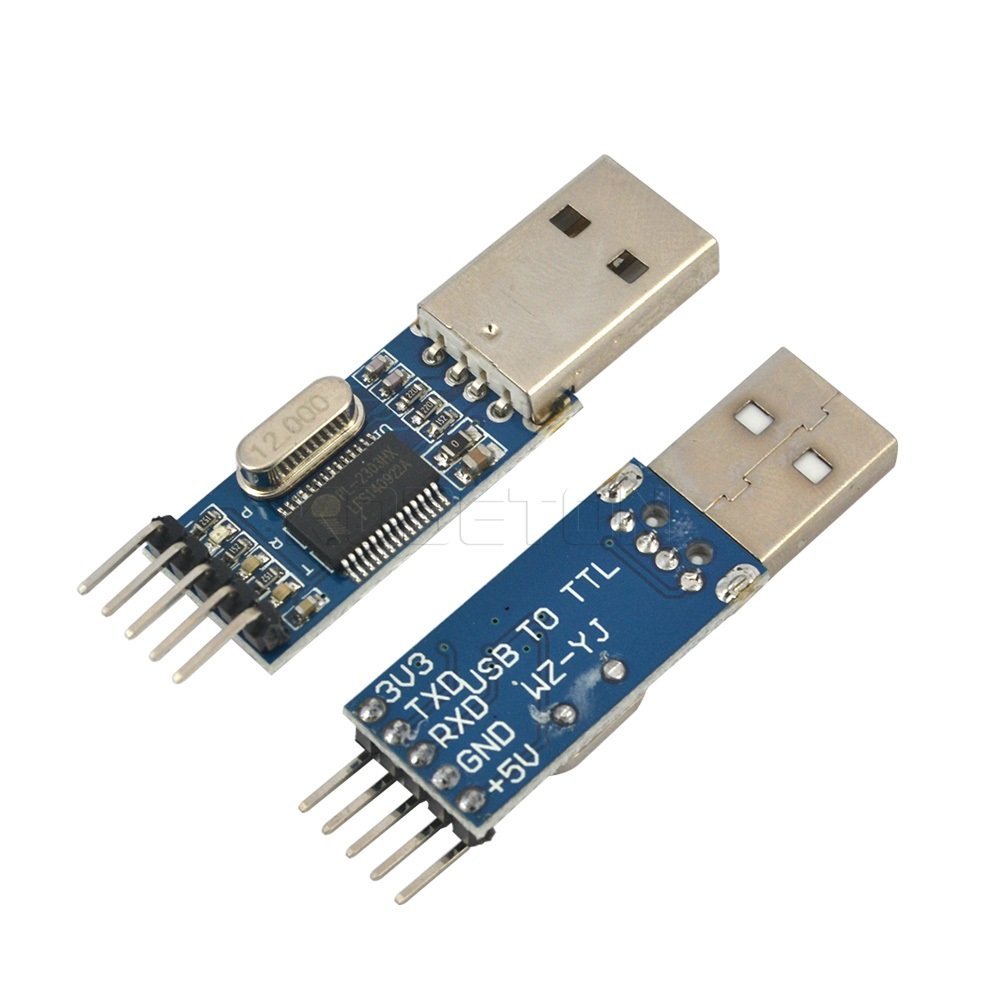
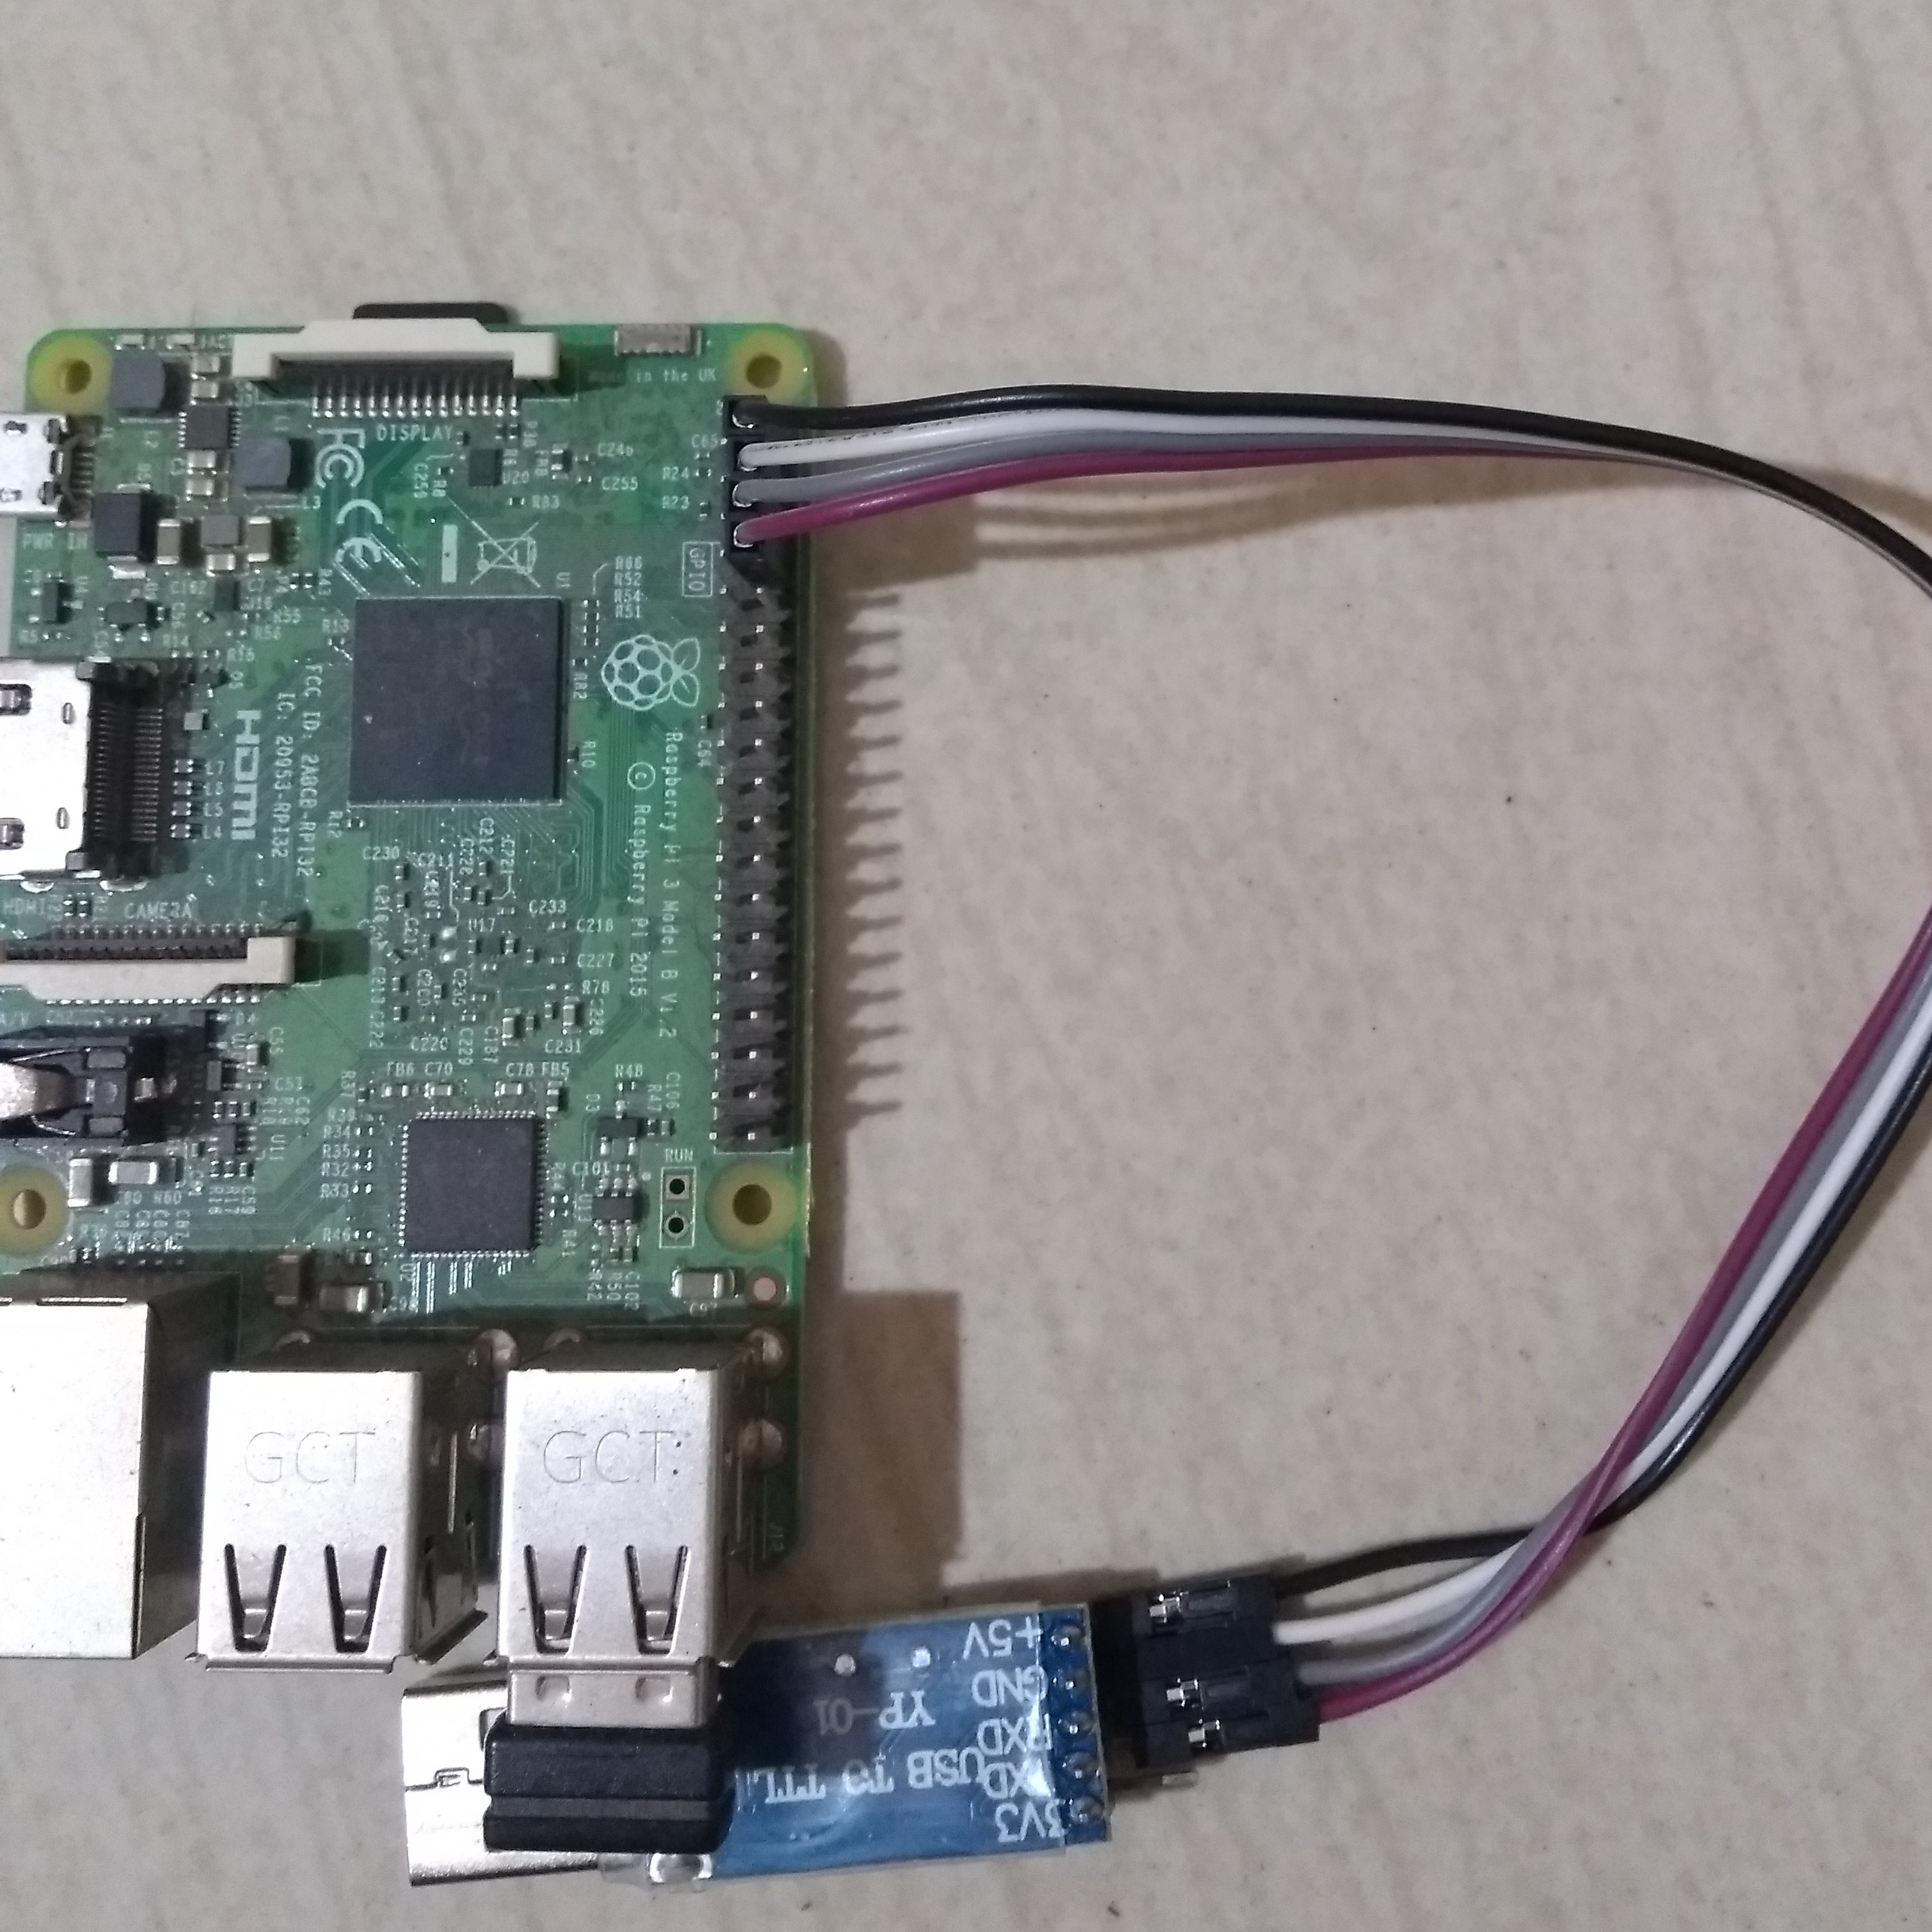
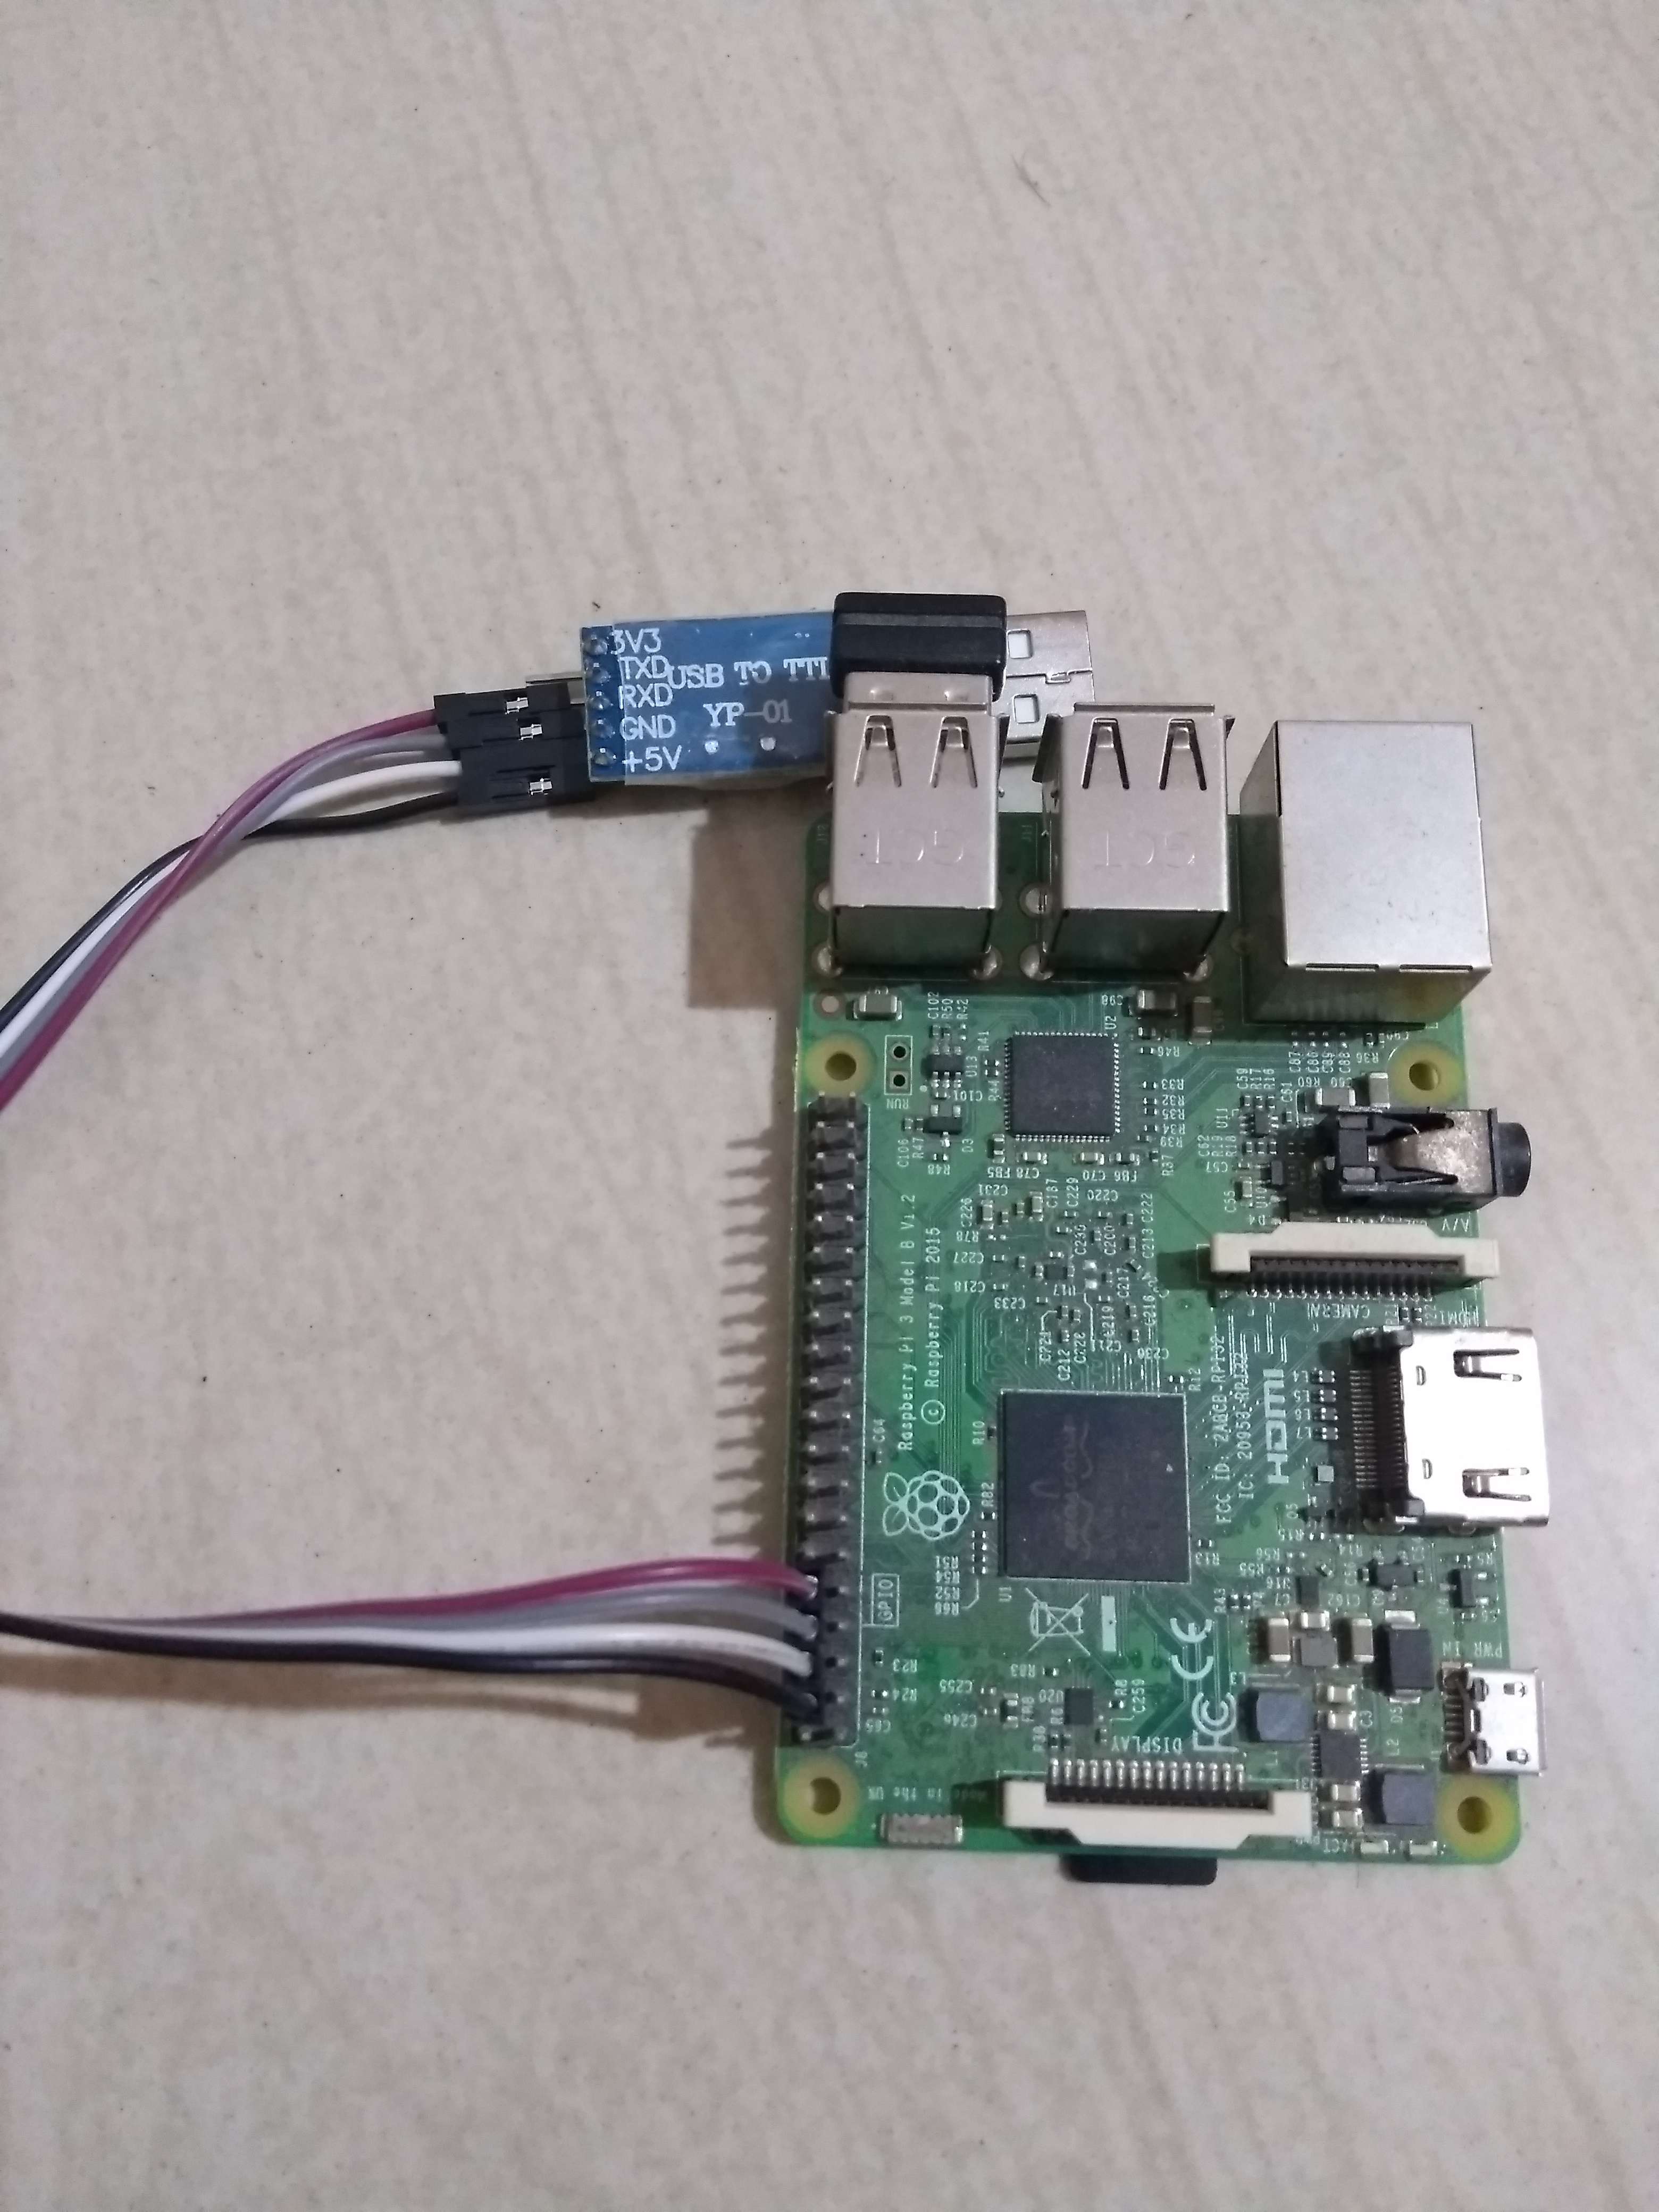
You can read previous posts to have better understanding about Yocto build environment and how to setup serial connection with Raspberry pi 3.

Target program and compilation

Going along with the world, we'll start with traditional Hello World program. Write the C program and cross-compile it to arm64 platform. Secure copy the executable binary to Raspberry Pi 3.

kaba@kaba-Vostro-1550:~/Desktop/workbench/code
$ cat syscall.c
#include <stdio.h>

int main()
{
    printf("Hello world!\n");
    return 0;
}
kaba@kaba-Vostro-1550:~/Desktop/workbench/code
$ source /opt/poky/2.4.2/environment-setup-aarch64-poky-linux 
kaba@kaba-Vostro-1550:~/Desktop/workbench/code
$ $CC -g syscall.c -o syscall.arm64.debug
kaba@kaba-Vostro-1550:~/Desktop/workbench/code
$ $CC syscall.c -o syscall.arm64
kaba@kaba-Vostro-1550:~/Desktop/workbench/code
$ ls
total 36K
-rwxr-xr-x 1 kaba kaba 14K Jun  3 12:07 syscall.arm64
-rwxr-xr-x 1 kaba kaba 16K Jun  3 12:07 syscall.arm64.debug
-rw-r--r-- 1 kaba kaba  73 May 31 06:48 syscall.c
kaba@kaba-Vostro-1550:~/Desktop/workbench/code
$ scp ./syscall.arm64 root@192.168.0.101:
syscall.arm64                                                                                                                                                             100%   13KB 488.8KB/s   00:00    

kaba@kaba-Vostro-1550:~/Desktop/workbench/code
$ 
We have two binaries compiled here. We have copied the one without symbols to target board. And the one with debug symbols will be passed as an argument cross-GDB.

Build GDB-server

Add gdbserver tool to the target image by enabling tools-debug in EXTRA_IMAGE_FEATURES. Run the Hello World program in target, attached with gdbserver that listens on network.

root@raspberrypi3-64:~# gdbserver 192.168.0.101:2345 ./syscall.arm64 
Process ./syscall.arm64 created; pid = 1671
Listening on port 2345
It will start the program and wait for remote-gdb to attach.

Build GDB with TUI support

GDB has a tui [Text User Interface] mode which will be very much useful while debugging. With tui enabled, we can see the code that runs, equivalent assembly instruction, current register values, etc., simultaneously. But by default the GDB in Yocto doesn't build with tui support. Append --enable-tui option to gdb-cross bbfile. And build the SDK as mentioned here.

kaba@kaba-Vostro-1550:~/Desktop/yocto/yocto
$ tree meta-kaba-hacks/
meta-kaba-hacks/
├── conf
│   └── layer.conf
├── COPYING.MIT
├── recipes-devtools
│   └── gdb
│       └── gdb-%.bbappend
└── recipes-kernel
    └── linux
        ├── linux-raspberrypi
           ├── debug.cfg
           └── enable_proc_zconfig.cfg
        └── linux-raspberrypi_4.9.bbappend

kaba@kaba-Vostro-1550:~/Desktop/yocto/yocto
$ cat meta-kaba-hacks/recipes-devtools/gdb/gdb-%.bbappend 
EXTRA_OECONF += " --enable-tui"
kaba@kaba-Vostro-1550:~/Desktop/yocto/yocto
$ bitbake core-image-base -c populate_sdk
kaba@kaba-Vostro-1550:~/Desktop/yocto/yocto
$ ./tmp/deploy/sdk/poky-glibc-x86_64-core-image-base-aarch64-toolchain-2.4.2.sh
kaba@kaba-Vostro-1550:~/Desktop/yocto/yocto
$ 

Launch

Run cross-GDB with tui enabled and connect it to the target.

kaba@kaba-Vostro-1550:~/Desktop/workbench/code
$ source /opt/poky/2.4.2/environment-setup-aarch64-poky-linux 
kaba@kaba-Vostro-1550:~/Desktop/workbench/code
$ $GDB -tui ./syscall.arm64.debug 
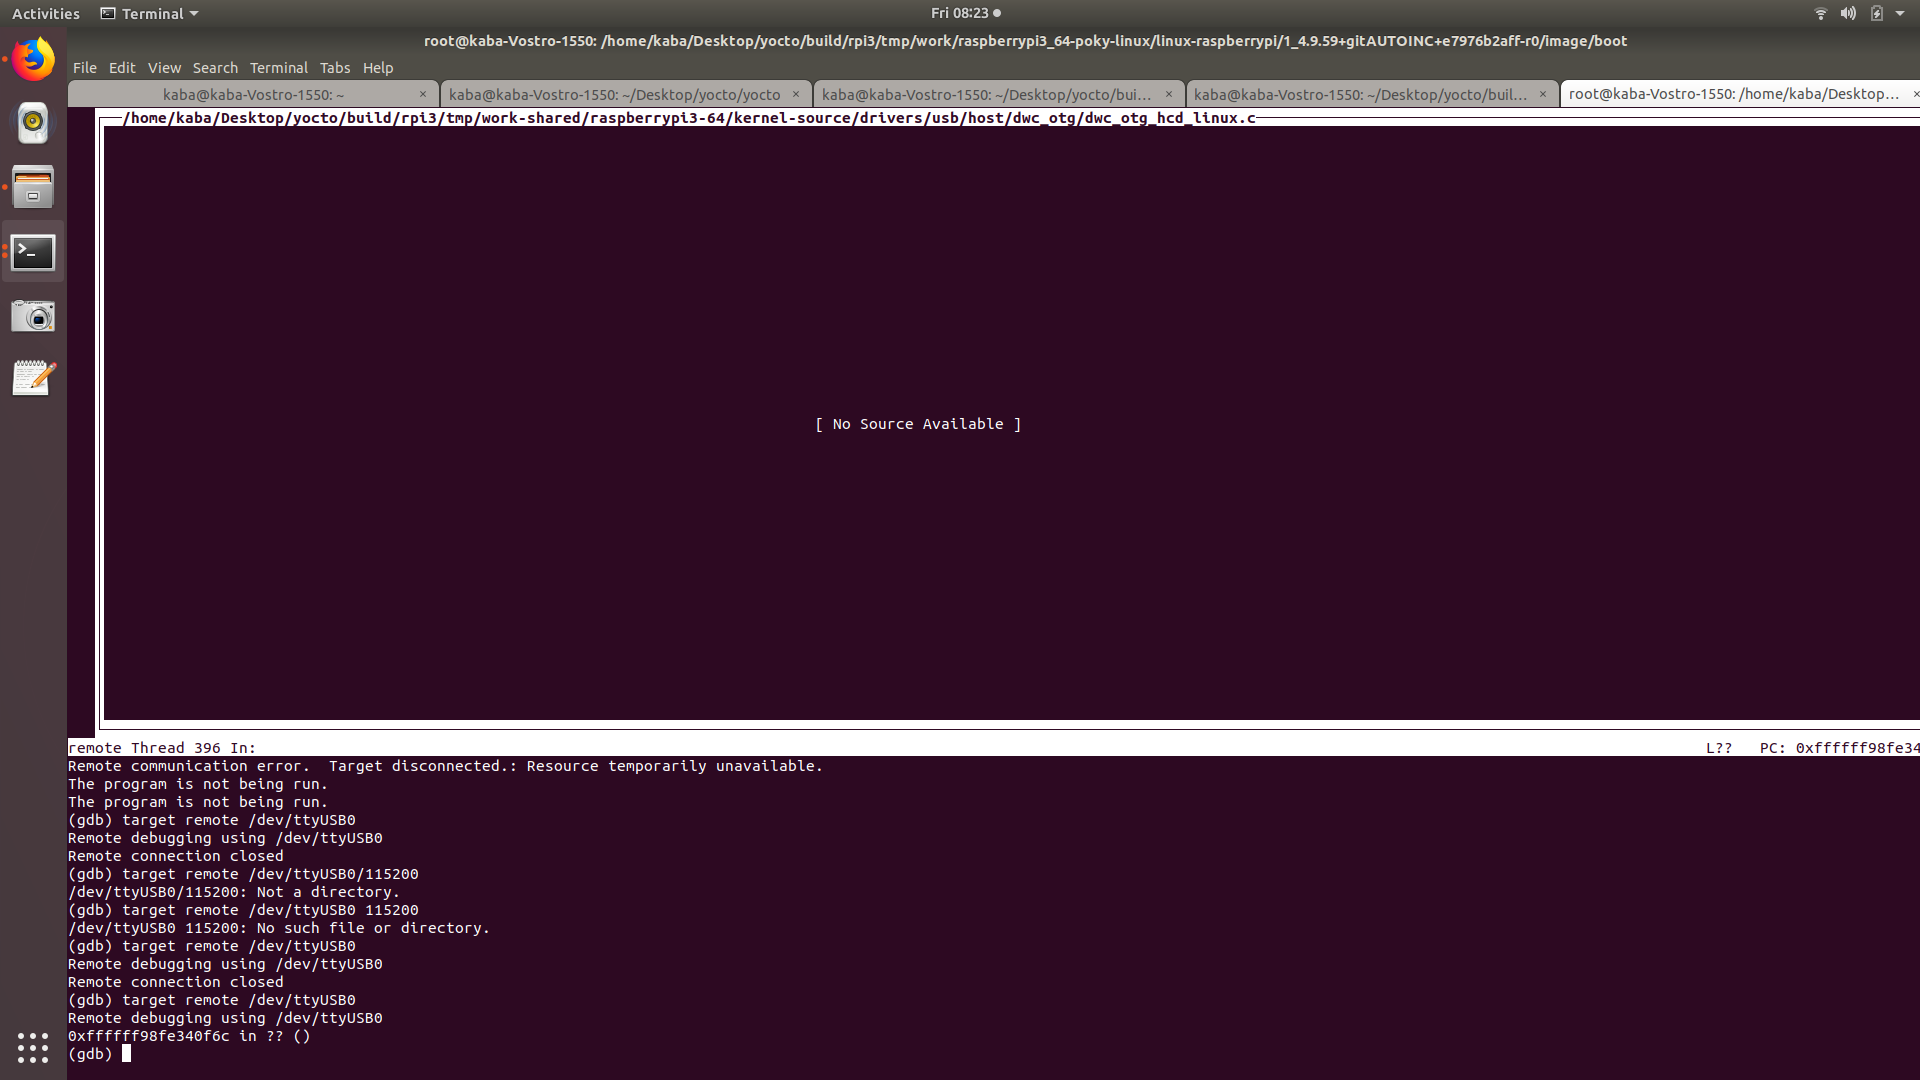
GDB window will open-up similar to the screenshot at the top of this post (zoom-in your web page to see the image details clearly). Below I'm copying only the command-panel of GDB. Based on the commands you run, the other panels will also get changed.

Connect to target program waiting for remote-GDB.

(gdb) target remote 192.168.0.101:2345
Remote debugging using 192.168.0.101:2345
Reading /lib/ld-linux-aarch64.so.1 from remote target...
warning: File transfers from remote targets can be slow. Use "set sysroot" to access files locally instead.
Reading /lib/ld-linux-aarch64.so.1 from remote target...
Reading symbols from target:/lib/ld-linux-aarch64.so.1...Reading /lib/ld-2.26.so from remote target...
Reading /lib/.debug/ld-2.26.so from remote target...
(no debugging symbols found)...done.
0x0000007fb7fd2f40 in ?? () from target:/lib/ld-linux-aarch64.so.1
(gdb) 

Now it connected to the target program. But it is not very much helpful. Because it tries to load the symbols and source from target board. The target has no source or symbol. Lets direct GDB to load source and symbol from host machine.

(gdb) set sysroot /opt/poky/2.4.2/sysroots/aarch64-poky-linux/
warning: .dynamic section for "/opt/poky/2.4.2/sysroots/aarch64-poky-linux/lib/ld-linux-aarch64.so.1" is not at the expected address (wrong library or version mismatch?)
Reading symbols from /opt/poky/2.4.2/sysroots/aarch64-poky-linux/lib/ld-linux-aarch64.so.1...Reading symbols from /opt/poky/2.4.2/sysroots/aarch64-poky-linux/lib/.debug/ld-2.26.so...done.
done.
Reading symbols from /opt/poky/2.4.2/sysroots/aarch64-poky-linux/lib/ld-linux-aarch64.so.1...Reading symbols from /opt/poky/2.4.2/sysroots/aarch64-poky-linux/lib/.debug/ld-2.26.so...done.
done.
(gdb) info sharedlibrary  
From                To                  Syms Read   Shared Object Library
0x0000007fb7fd2dc0  0x0000007fb7fe9fc8  Yes         /opt/poky/2.4.2/sysroots/aarch64-poky-linux/lib/ld-linux-aarch64.so.1
(gdb)
Set a break-point in main and continue. So the program will pause once it reaches main. Now if you see, there will be another shared library loaded.
(gdb) break main
Breakpoint 1 at 0x40056c: file syscall.c, line 5.
(gdb) c
Continuing.

Breakpoint 1, main () at syscall.c:5
(gdb) info sharedlibrary
From                To                  Syms Read   Shared Object Library
0x0000007fb7fd2dc0  0x0000007fb7fe9fc8  Yes         /opt/poky/2.4.2/sysroots/aarch64-poky-linux/lib/ld-linux-aarch64.so.1
0x0000007fb7ea0700  0x0000007fb7f8a118  Yes         /opt/poky/2.4.2/sysroots/aarch64-poky-linux/lib/libc.so.6
(gdb) 
Now you can see the line printf on the top panel will be highlighted. It means, that is the current line to be executed. Lets step in to the definition of printf.
(gdb) s
_IO_puts (str=0x400638 "Hello world!") at /usr/src/debug/glibc/2.26-r0/git/libio/ioputs.c:36
(gdb)
The control went into the library function. But we can see the top panel starts showing No Source Available error. This is because GDB searches the source files in wrong directory. Have a second look at last output. GDB searches ioputs.c in /usr/src/debug/glibc/2.26-r0/git/libio directory. Lets set the path to shared library correct.
(gdb) set substitute-path /usr/src/debug/ /home/kaba/Desktop/yocto/build/rpi3/tmp/work/aarch64-poky-linux/
(gdb)
Now you can see the source started appearing in the top-panel. Read more about GDB commands and have fun.

References

  • [https://sourceware.org/gdb/onlinedocs/gdb/Source-Path.html]
  • [http://visualgdb.com/gdbreference/commands/sharedlibrary]
  • [http://visualgdb.com/gdbreference/commands/set_solib-search-path]
  • [https://www.yoctoproject.org/docs/1.4.2/adt-manual/adt-manual.html]
  • [https://www.yoctoproject.org/docs/latest/mega-manual/mega-manual.html]

KGDB/KDB over serial with Raspberry Pi

Hardware setup

We need a USB to serial converter to connect Raspberry Pi to the PC serially. This is the cheapest among all converters available in Amazon. This is based on PL2302 chip. I'm not sure it's original or Chinese replica. In my case it worked out of the box with Ubuntu-17.10. In case if it throws error-10, try downgrading your PL2303 driver. Because the manufacturer blocked all counterfeit chips in his latest driver. I ordered this one and a set of female-to-female jumper wires. Wait for three days and continue with this article.


Interfacing is simple - Connect 5V to 5V - Connect TX of converter with RxD of Raspberry's GPIO UART - Connect RX of converter with TxD of Raspberry's GPIO UART - Connect the ground to ground


Below the Raspberry Pi GPIO pin layout Raspberry Pi 3 GPIO pin layout
PL2303's pin layout PL2303 USB to TTL converter pin layout
And the connection goes like this, Raspberry Pi 3 serial connection Raspberry Pi 3 serial connection
As power is supplied via GPIO pin, there is no need of external power supply. I don't know what will happen if both power sources are connected. I'm not dare to try.

Software setup

  • Kernel has to be built with debug support
  • Enable tui support for GDB - if required

For that I have created a custom layer with following tree structure.

meta-kaba-hacks/
├── conf
│   └── layer.conf
├── COPYING.MIT
├── recipes-devtools
│   └── gdb
│       └── gdb-%.bbappend
└── recipes-kernel
    └── linux
        ├── linux-raspberrypi
           ├── debug.cfg
           └── enable_proc_zconfig.cfg
        └── linux-raspberrypi_4.9.bbappend
Enable debug symbols and KGDB/KDB related configs in Linux.
kaba@kaba-Vostro-1550:~/Desktop/yocto/yocto
$ cat meta-kaba-hacks/recipes-kernel/linux/linux-raspberrypi_4.9.bbappend
FILESEXTRAPATHS_prepend := "${THISDIR}/${PN}:"
SRC_URI += "\
            file://debug.cfg \
            file://enable_proc_zconfig.cfg \
            "
kaba@kaba-Vostro-1550:~/Desktop/yocto/yocto
$ cat meta-kaba-hacks/recipes-kernel/linux/linux-raspberrypi/debug.cfg
# CONFIG_STRICT_KERNEL_RWX is not set
CONFIG_DEBUG_INFO=y
CONFIG_FRAME_POINTER=y
CONFIG_KGDB=y
CONFIG_KGDB_SERIAL_CONSOLE=y
CONFIG_KGDB_KDB=y
CONFIG_KDB_KEYBOARD=y
kaba@kaba-Vostro-1550:~/Desktop/yocto/yocto
$ cat meta-kaba-hacks/recipes-kernel/linux/linux-raspberrypi/enable_proc_zconfig.cfg
CONFIG_IKCONFIG=y
CONFIG_IKCONFIG_PROC=y
kaba@kaba-Vostro-1550:~/Desktop/yocto/yocto
$
By default tui options is disabled for GDB in yocto. So I'm overriding it to enable it.
kaba@kaba-Vostro-1550:~/Desktop/yocto/yocto
$ cat meta-kaba-hacks/recipes-devtools/gdb/gdb-%.bbappend
EXTRA_OECONF += " --enable-tui"
kaba@kaba-Vostro-1550:~/Desktop/yocto/yocto
$

Build kernel and populate_sdk. Refer this and this if you need help on working with Yocto. And copy the newly built image to Raspberry Pi.

Enable Serial in Raspberry Pi

By default serial interface is not enabled in yocto built Raspberry Pi distribution. We have to enable it in the config.txt file. Connect the SD-card written with Raspberry Pi image to PC and mount first partition. Append enable_uart=1 to the config.txt file.

kaba@kaba-Vostro-1550:~/Desktop/yocto/build/rpi3
$ mount | grep sdb1
/dev/sdb1 on /media/kaba/raspberrypi type vfat (rw,nosuid,nodev,relatime,uid=1000,gid=1000,fmask=0022,dmask=0022,codepage=437,iocharset=iso8859-1,shortname=mixed,showexec,utf8,flush,errors=remount-ro,uhelper=udisks2)
kaba@kaba-Vostro-1550:~/Desktop/yocto/build/rpi3
$ tail /media/kaba/raspberrypi/config.txt
#dtparam=pwr_led_gpio=35
# Enable VC4 Graphics
dtoverlay=vc4-fkms-v3d,cma-256
# have a properly sized image
disable_overscan=1
# Enable audio (loads snd_bcm2835)
dtparam=audio=on
# Load correct Device Tree for Aarch64
device_tree=bcm2710-rpi-3-b.dtb
enable_uart=1
kaba@kaba-Vostro-1550:~/Desktop/yocto/build/rpi3
$
In the host machine open serial console using screen. And connect the USB to ttl converter with PC. You should see the logs of Raspberry Pi booting.
$ sudo screen /det/ttyUSB0 115200

Debug after boot complete

Configure KDBoC module to use ttyS0 and enter KDB mode using sysrq-trigger. In KDB console, enter kgdb to make kernel listen to remote GDB debugger.

root@raspberrypi3-64:~# echo ttyS0 > /sys/module/kgdboc/parameters/kgdboc
[  219.105202] KGDB: Registered I/O driver kgdboc
root@raspberrypi3-64:~# echo g > /proc/sysrq-trigger
[  255.963036] sysrq: SysRq : DEBUG

Entering kdb (current=0xfffffff2f7f60000, pid 396) on processor 3 due to Keyboard Entry
[3]kdb> kgdb
Entering please attach debugger or use $D#44+ or $3#33
Raspberry Pi will be waiting for GDB client debugger connect serially.

Debug during boot

If you want to debug something during boot, you have to connect GDB at very early stage of booting. Linux provides a command line argument option to achieve this. Configure kgdboc and kgdbwait in kernel bootargs. So kernel will wait after minimal initialization of hardware.

root@raspberrypi3-64:~# cat /boot/cmdline.txt
dwc_otg.lpm_enable=0 console=serial0,115200 kgdboc=ttyS0,115200 kgdbwait root=/dev/mmcblk0p2 rootfstype=ext4 rootwait
root@raspberrypi3-64:~# reboot
WARNING: As mentioned [here](https://github.com/raspberrypi/linux/issues/2245), it is a known issue that Raspberry Pi 3 doesn't boot with `kgdboc` set. So this will not work as of now. Let me find a work-around and update that in a future post.

GDB connect

When Pi started waiting for GDB to connect, run the cross-GDB from host. You have to run this as a root.

root@kaba-Vostro-1550:/home/kaba/Desktop/yocto/build/rpi3/tmp/work/raspberrypi3_64-poky-linux/linux-raspberrypi/1_4.9.59+gitAUTOINC+e7976b2aff-r0/image/boot# /home/kaba/Desktop/yocto/build/rpi3/tmp/work/x86_64-nativesdk-pokysdk-linux/gdb-cross-canadian-aarch64/8.0-r0/image/opt/poky/2.4.2/sysroots/x86_64-pokysdk-linux/usr/bin/aarch64-poky-linux/aarch64-poky-linux-gdb -tui ./vmlinux-4.9.59
Once GDB is connected to the board, it will look like this. Raspberry Pi GDB session

References

  • [https://kaiwantech.wordpress.com/2013/07/04/a-kdb-kgdb-session-on-the-popular-raspberry-pi-embedded-linux-board/]
  • [https://github.com/FooDeas/raspberrypi-ua-netinst/issues/122]
  • [https://www.raspberrypi.org/forums/viewtopic.php?t=19186]

KGDBoE on RaspberryPi - building out of the kernel tree module with yocto

WARNING: KGDBoE cannot be used in Raspberry Pi due to lack of polling support in its network drivers. This post will be useful in future if polling is added. Also this post can be used as a reference for building kernel module that is out of kernel tree.

On host

Building module in Raspberry Pi itself will take more time. Also it requires multiple development tools to be added to final image which will drastically increase the image size. To cross-compile we need SDK for Raspberry Pi.

kaba@kaba-Vostro-1550:~/Desktop/yocto/yocto
$ source poky/oe-init-build-env ../build/rpi3/

### Shell environment set up for builds. ###

You can now run 'bitbake <target>'

Common targets are:
    core-image-minimal
    core-image-sato
    meta-toolchain
    meta-ide-support

You can also run generated qemu images with a command like 'runqemu qemux86'
kaba@kaba-Vostro-1550:~/Desktop/yocto/build/rpi3
$
kaba@kaba-Vostro-1550:~/Desktop/yocto/build/rpi3
$ bitbake core-image-base -c populate_sdk
WARNING: Host distribution "ubuntu-17.10" has not been validated with this version of the build system; you may possibly experience unexpected failures. It is recommended that you use a tested distribution.
Loading cache: 100% |#####################################################################################################| Time: 0:00:00
Loaded 2783 entries from dependency cache.
NOTE: Resolving any missing task queue dependencies

Build Configuration:
BB_VERSION           = "1.36.0"
BUILD_SYS            = "x86_64-linux"
NATIVELSBSTRING      = "universal"
TARGET_SYS           = "aarch64-poky-linux"
MACHINE              = "raspberrypi3-64"
DISTRO               = "poky"
DISTRO_VERSION       = "2.4.2"
TUNE_FEATURES        = "aarch64"
TARGET_FPU           = ""
meta                 
meta-poky            
meta-yocto-bsp       = "rocko:fdeecc901196bbccd7c5b1ea4268a2cf56764a62"
meta-oe              
meta-multimedia      
meta-networking      
meta-python          = "rocko:a65c1acb1822966c3553de9fc98d8bb6be705c4e"
meta-raspberrypi     = "rocko:20358ec57a8744b0a02da77b283620fb718b0ee0"

Initialising tasks: 100% |################################################################################################| Time: 0:00:11
NOTE: Executing SetScene Tasks
NOTE: Executing RunQueue Tasks
NOTE: Tasks Summary: Attempted 3589 tasks of which 3589 didn't need to be rerun and all succeeded.

Summary: There was 1 WARNING message shown.
kaba@kaba-Vostro-1550:~/Desktop/yocto/build/rpi3
Once done, the script to install SDK will be present in ./tmp/deploy/sdk/. Run the script poky-glibc-x86_64-core-image-base-aarch64-toolchain-2.4.2.sh. This will install the SDK in /opt/ directory by default.
kaba@kaba-Vostro-1550:~/Desktop/yocto/build/rpi3
$ ./tmp/deploy/sdk/poky-glibc-x86_64-core-image-base-aarch64-toolchain-2.4.2.sh 
Poky (Yocto Project Reference Distro) SDK installer version 2.4.2
=================================================================
Enter target directory for SDK (default: /opt/poky/2.4.2): 
The directory "/opt/poky/2.4.2" already contains a SDK for this architecture.
If you continue, existing files will be overwritten! Proceed[y/N]? N
Installation aborted!
kaba@kaba-Vostro-1550:~/Desktop/yocto/build/rpi3
$ ls /opt/poky/2.4.2/
environment-setup-aarch64-poky-linux  sysroots/                             
site-config-aarch64-poky-linux        version-aarch64-poky-linux            
kaba@kaba-Vostro-1550:~/Desktop/yocto/build/rpi3
$ 
I didn't overwrite files as I have installed it already. The script environment-setup-aarch64-poky-linux is the one that will setup the cross-build environment for us.

Clone the KGDBoE source from Github. Setup cross-build environment and build the module.

$ git clone https://github.com/sysprogs/kgdboe.git
Cloning into 'kgdboe'...
remote: Counting objects: 172, done.
remote: Total 172 (delta 0), reused 0 (delta 0), pack-reused 171
Receiving objects: 100% (172/172), 51.95 KiB | 81.00 KiB/s, done.
Resolving deltas: 100% (114/114), done.
kaba@kaba-Vostro-1550:~/Desktop/yocto/build/rpi3/cross-compile
$
kaba@kaba-Vostro-1550:~/Desktop/yocto/build/rpi3/cross-compile
$ cd kgdboe
kaba@kaba-Vostro-1550:~/Desktop/yocto/build/rpi3/cross-compile/kgdboe
$ source /opt/poky/2.4.2/environment-setup-aarch64-poky-linux 
kaba@kaba-Vostro-1550:~/Desktop/yocto/build/rpi3/cross-compile/kgdboe
$ make -C /home/kaba/Desktop/yocto/build/rpi3/tmp/work/raspberrypi3_64-poky-linux/linux-raspberrypi/1_4.9.59+gitAUTOINC+e7976b2aff-r0/linux-raspberrypi3_64-standard-build M=$(pwd)
make: Entering directory '/home/kaba/Desktop/yocto/build/rpi3/tmp/work/raspberrypi3_64-poky-linux/linux-raspberrypi/1_4.9.59+gitAUTOINC+e7976b2aff-r0/linux-raspberrypi3_64-standard-build'
  LD      /home/kaba/Desktop/yocto/build/rpi3/cross-compile/kgdboe/built-in.o
  CC [M]  /home/kaba/Desktop/yocto/build/rpi3/cross-compile/kgdboe/irqsync.o
  CC [M]  /home/kaba/Desktop/yocto/build/rpi3/cross-compile/kgdboe/kgdboe_main.o
  CC [M]  /home/kaba/Desktop/yocto/build/rpi3/cross-compile/kgdboe/kgdboe_io.o
/home/kaba/Desktop/yocto/build/rpi3/cross-compile/kgdboe/kgdboe_io.c: In function 'force_single_cpu_mode':
/home/kaba/Desktop/yocto/build/rpi3/cross-compile/kgdboe/kgdboe_io.c:119:3: error: implicit declaration of function 'cpu_down'; did you mean 'cpu_die'? [-Werror=implicit-function-declaration]
   cpu_down(i);
   ^~~~~~~~
   cpu_die
cc1: some warnings being treated as errors
/home/kaba/Desktop/yocto/build/rpi3/tmp/work-shared/raspberrypi3-64/kernel-source/scripts/Makefile.build:293: recipe for target '/home/kaba/Desktop/yocto/build/rpi3/cross-compile/kgdboe/kgdboe_io.o' failed
make[3]: *** [/home/kaba/Desktop/yocto/build/rpi3/cross-compile/kgdboe/kgdboe_io.o] Error 1
/home/kaba/Desktop/yocto/build/rpi3/tmp/work-shared/raspberrypi3-64/kernel-source/Makefile:1493: recipe for target '_module_/home/kaba/Desktop/yocto/build/rpi3/cross-compile/kgdboe' failed
make[2]: *** [_module_/home/kaba/Desktop/yocto/build/rpi3/cross-compile/kgdboe] Error 2
Makefile:150: recipe for target 'sub-make' failed
make[1]: *** [sub-make] Error 2
Makefile:24: recipe for target '__sub-make' failed
make: *** [__sub-make] Error 2
make: Leaving directory '/home/kaba/Desktop/yocto/build/rpi3/tmp/work/raspberrypi3_64-poky-linux/linux-raspberrypi/1_4.9.59+gitAUTOINC+e7976b2aff-r0/linux-raspberrypi3_64-standard-build'
kaba@kaba-Vostro-1550:~/Desktop/yocto/build/rpi3/cross-compile/kgdboe
$
cpu_down function is not available in ARM platform. It is used to shutdown all but one core when debugging, because debugging with single CPU is desirable unless e debug SMP related issues. I couldn't find equivalent ARM function. So let's comment out this call and disable CPUs during boot using bootargs.
kaba@kaba-Vostro-1550:~/Desktop/yocto/build/rpi3/cross-compile/kgdboe
$ git diff
diff --git a/kgdboe_io.c b/kgdboe_io.c
index 1d02360..0d32c36 100644
--- a/kgdboe_io.c
+++ b/kgdboe_io.c
@@ -115,8 +115,8 @@ void force_single_cpu_mode(void)
        printk(KERN_INFO "kgdboe: single-core mode enabled. Shutting down all cores except #0. This is slower, but safer.\n");
        printk(KERN_INFO "kgdboe: you can try using multi-core mode by specifying the following argument:\n");
        printk(KERN_INFO "\tinsmod kgdboe.ko force_single_core = 0\n");
-       for (int i = 1; i < nr_cpu_ids; i++)
-               cpu_down(i);
+       /*for (int i = 1; i < nr_cpu_ids; i++)*/
+               /*cpu_down(i);*/
 }
kaba@kaba-Vostro-1550:~/Desktop/yocto/build/rpi3/cross-compile/kgdboe
$
This time the build gave following linker error.
aarch64-poky-linux-ld: unrecognized option '-Wl,-O1'
This is because the LDFLAGS environment variable. Kernel module Makefile requires LDFLAGS to be set as only the options without -Wl. So it appends whatever there in LDFLAGS with -Wl. As LDFLAGS has another -Wl, we are getting unrecognized option error. So remove all -Wls from LDFLAGS.
$ echo $LDFLAGS 
-Wl,-O1 -Wl,--hash-style=gnu -Wl,--as-needed
$ export LDFLAGS="-O1 --hash-style=gnu --as-needed"
$ echo $LDFLAGS 
-O1 --hash-style=gnu --as-needed
And build now.
kaba@kaba-Vostro-1550:~/Desktop/yocto/build/rpi3/cross-compile/kgdboe
$ make -C /home/kaba/Desktop/yocto/build/rpi3/tmp/work/raspberrypi3_64-poky-linux/linux-raspberrypi/1_4.9.59+gitAUTOINC+e7976b2aff-r0/linux-raspberrypi3_64-standard-build M=$(pwd)
make: Entering directory '/home/kaba/Desktop/yocto/build/rpi3/tmp/work/raspberrypi3_64-poky-linux/linux-raspberrypi/1_4.9.59+gitAUTOINC+e7976b2aff-r0/linux-raspberrypi3_64-standard-build'
  LD [M]  /home/kaba/Desktop/yocto/build/rpi3/cross-compile/kgdboe/kgdboe.o
  Building modules, stage 2.
  MODPOST 1 modules
  CC      /home/kaba/Desktop/yocto/build/rpi3/cross-compile/kgdboe/kgdboe.mod.o
  LD [M]  /home/kaba/Desktop/yocto/build/rpi3/cross-compile/kgdboe/kgdboe.ko
make: Leaving directory '/home/kaba/Desktop/yocto/build/rpi3/tmp/work/raspberrypi3_64-poky-linux/linux-raspberrypi/1_4.9.59+gitAUTOINC+e7976b2aff-r0/linux-raspberrypi3_64-standard-build'
kaba@kaba-Vostro-1550:~/Desktop/yocto/build/rpi3/cross-compile/kgdboe
$ ls kgdboe.ko
-rw-r--r-- 1 kaba kaba 2.1M May  5 16:11 kgdboe.ko
kaba@kaba-Vostro-1550:~/Desktop/yocto/build/rpi3/cross-compile/kgdboe
$
Now scp the module kgdboe.ko to Raspberry Pi.
kaba@kaba-Vostro-1550:~/Desktop/yocto/build/rpi3/cross-compile/kgdboe
$ scp kgdboe.ko root@192.168.0.101

On Target

Add maxcpus=1 option to Raspberry Pi's kernel command line to disable all but one core. The bootargs can be found in the file cmdline.txt in first partition of the SD card.

$ ssh root@192.168.0.101
Last login: Sat May  5 07:59:44 2018 from 192.168.0.108
root@raspberrypi3-64:~# ls
kgdboe.ko
root@raspberrypi3-64:~# mount /dev/mmcblk0p1 /boot
root@raspberrypi3-64:~# cat /boot/cmdline.txt 
dwc_otg.lpm_enable=0 console=serial0,115200 root=/dev/mmcblk0p2 rootfstype=ext4 rootwait maxcpus=1
root@raspberrypi3-64:~#
Reboot the Pi and try installing the module.
root@raspberrypi3-64:~# cat /proc/cmdline 
8250.nr_uarts=0 cma=256M bcm2708_fb.fbwidth=1920 bcm2708_fb.fbheight=1080 bcm2708_fb.fbswap=1 vc_mem.mem_base=0x3ec00000 vc_mem.mem_size=0x40000000  dwc_otg.lpm_enable=0 console=ttyS0,115200 root=/dev/mmcblk0p2 rootfstype=ext4 rootwait maxcpus=1
root@raspberrypi3-64:~# insmod kgdboe.ko 
insmod: ERROR: could not insert module kgdboe.ko: Invalid parameters
root@raspberrypi3-64:~# dmesg | tail -5
[ 1211.816691] kgdboe: Failed to setup netpoll for eth0, code -524
[ 8814.348313] netpoll: kgdboe: local IP 1.1.1.101
[ 8814.348344] netpoll: kgdboe: eth0 doesn't support polling, aborting
[ 8814.348360] kgdboe: Failed to setup netpoll for eth0, code -524
root@raspberrypi3-64:~#
Due to lack of polling support, Kernel debugging over Ethernet is not available for as of now. If you are reading this, you are part of the clan having hope.

References

  • [http://sysprogs.com/VisualKernel/kgdboe/tutorial/]
  • [https://github.com/raspberrypi/linux/blob/rpi-4.14.y/arch/arm64/Kconfig]
  • [https://sysprogs.com/w/forums/topic/two-problems-1-linuxkerneldebughelper-seg-fault-and-2-kgdboe-build-fails/]
  • [https://stackoverflow.com/questions/25407320/what-is-the-signification-of-ldflags]
  • [https://github.com/raspberrypi/linux/issues/1877]

Raspberry Pi dishes from Yocto cuisine

Recently I got some board bring-up work where I come across Yocto project. To complete that project, I had to understand a little more than the basics of Yocto. So I had some hands on like Yocto Project Quick Start and Yocto Project Linux Kernel Development Manual. Seems Yocto is so powerful thus I thought of starting to use it for my Raspberry Pi hacking. As expected there are already people tried doing so and there are some good blogs about what they have accomplished. But to my surprise, there is already a meta layer for Raspberry Pi 3. It makes the work even simpler.

I created a directory in Desktop as base for the development. Inside it I created build, downloads, sstate, tmp and yocto layers directories.

$ ls
build  downloads  sstate  sstate-cache  tmp  yocto
With reference to the meta-raspberry quick start page, I have cloned poky, meta-openembedded and meta-raspberry inside the yocto directory. And checkout to specific branches.
$ cd yocto
$ git clone git://git.yoctoproject.org/poky.git
$ cd poky
$ git checkout origin/master
$ $ git rev-parse HEAD
da3625c52e1ab8985fba4fc3d133edf92142f182
$
$ cd ..
$ git clone git://git.openembedded.org/meta-openembedded
$ cd meta-openembedded
$ $ git rev-parse HEAD
271ce3576be25d8012af15961f827aa2235e6434
$
$ cd ..
$ git clone git://git.yoctoproject.org/meta-raspberrypi
$ cd meta-raspberry
$ git checkout master
$ git rev-parse HEAD
693f36dded2f29fd77720f7b2e7c88ea76554466
You can find all the available layers here

Only the above branches and commits worked for me. With rocko branch had pypi.class error

Sourced the oe-init script to setup build environment. And then configured the conf/bblayers.conf file to include meta-layers from meta-openembedded and meta-raspberry layers. The meta-raspberry quick start specifies meta-oe, meta-multimedia, meta-networking and meta-python as dependencies for meta-raspberry. So I'm including all of the into my conf/bblayers.conf file.

$ source yocto/poky/oe-init-build-env build/rpi3/

### Shell environment set up for builds. ###

You can now run 'bitbake <target>'

Common targets are:
    core-image-minimal
    core-image-sato
    meta-toolchain
    meta-ide-support

You can also run generated qemu images with a command like 'runqemu qemux86'
$ pwd
/home/kaba/Desktop/yocto/build/rpi3
$ cat conf/bblayers.conf
# POKY_BBLAYERS_CONF_VERSION is increased each time build/conf/bblayers.conf
# changes incompatibly
POKY_BBLAYERS_CONF_VERSION = "2"

BBPATH = "${TOPDIR}"
BBFILES ?= ""

BBLAYERS ?= " \
  ${TOPDIR}/../../yocto/poky/meta \
  ${TOPDIR}/../../yocto/poky/meta-poky \
  ${TOPDIR}/../../yocto/poky/meta-yocto-bsp \
  ${TOPDIR}/../../yocto/meta-openembedded/meta-oe \
  ${TOPDIR}/../../yocto/meta-openembedded/meta-multimedia \
  ${TOPDIR}/../../yocto/meta-openembedded/meta-networking \
  ${TOPDIR}/../../yocto/meta-openembedded/meta-python \
  ${TOPDIR}/../../yocto/meta-raspberrypi \
  "
$
Then made following changes in conf/local.conf. * Set the MACHINE variable to point raspberry Pi 3 [raspberrypi3-64]. * Set SSTATE_DIR, TMPDIR and DL_DIR to point to sstate, tmp and downloads directories respectively. * I usually run my Pi headless. So I enabled ssh-server-openssh EXTRA_IMAGE_FEATURE. Its up to your choice. * Left the other default options as it was.

$ ls ../../yocto/meta-raspberrypi/conf/machine/
include                 raspberrypi2.conf     raspberrypi-cm3.conf
raspberrypi0.conf       raspberrypi3-64.conf  raspberrypi-cm.conf
raspberrypi0-wifi.conf  raspberrypi3.conf     raspberrypi.conf
$
$ cat conf/local.conf 
MACHINE = "raspberrypi3-64"
DISTRO ?= "poky"
PACKAGE_CLASSES ?= "package_rpm"
EXTRA_IMAGE_FEATURES ?= "debug-tweaks ssh-server-openssh"
USER_CLASSES ?= "buildstats image-mklibs image-prelink"
PATCHRESOLVE = "noop"
CONF_VERSION = "1"

SSTATE_DIR ?= "${TOPDIR}/../../sstate-cache"
TMPDIR ?= "${TOPDIR}/../../tmp"
DL_DIR ?= "${TOPDIR}/../../downloads"

PACKAGECONFIG_append_pn-qemu-native = " sdl"
PACKAGECONFIG_append_pn-nativesdk-qemu = " sdl"
BB_DISKMON_DIRS ??= "\
    STOPTASKS,${TMPDIR},1G,100K \
    STOPTASKS,${DL_DIR},1G,100K \
    STOPTASKS,${SSTATE_DIR},1G,100K \
    STOPTASKS,/tmp,100M,100K \
    ABORT,${TMPDIR},100M,1K \
    ABORT,${DL_DIR},100M,1K \
    ABORT,${SSTATE_DIR},100M,1K \
    ABORT,/tmp,10M,1K"

#SDKMACHINE ?= "i686"
#ASSUME_PROVIDED += "libsdl-native"
$
The variable ${TOPDIR} represents the build directory by default. debug-tweaks will enable root account without password. ssh-server-openssh will install an ssh server using openssh. And the ssh server will be started automatically during boot-up.

Build a basic image - core-image-base

$ bitbake core-image-base
WARNING: Layer openembedded-layer should set LAYERSERIES_COMPAT_openembedded-layer in its conf/layer.conf file to list the core layer names it is compatible with.
WARNING: Layer multimedia-layer should set LAYERSERIES_COMPAT_multimedia-layer in its conf/layer.conf file to list the core layer names it is compatible with.
WARNING: Layer networking-layer should set LAYERSERIES_COMPAT_networking-layer in its conf/layer.conf file to list the core layer names it is compatible with.
WARNING: Layer meta-python should set LAYERSERIES_COMPAT_meta-python in its conf/layer.conf file to list the core layer names it is compatible with.
WARNING: Host distribution "ubuntu-17.10" has not been validated with this version of the build system; you may possibly experience unexpected failures. It is recommended that you use a tested distribution.
Parsing recipes: 100% |#################################################################################################################################################| Time: 0:03:49
Parsing of 2081 .bb files complete (0 cached, 2081 parsed). 2940 targets, 116 skipped, 0 masked, 0 errors.
NOTE: Resolving any missing task queue dependencies

Build Configuration:
BB_VERSION           = "1.37.0"
BUILD_SYS            = "x86_64-linux"
NATIVELSBSTRING      = "ubuntu-17.10"
TARGET_SYS           = "aarch64-poky-linux"
MACHINE              = "raspberrypi3-64"
DISTRO               = "poky"
DISTRO_VERSION       = "2.5"
TUNE_FEATURES        = "aarch64"
TARGET_FPU           = ""
meta                 
meta-poky            
meta-yocto-bsp       = "HEAD:da3625c52e1ab8985fba4fc3d133edf92142f182"
meta-oe              
meta-multimedia      
meta-networking      
meta-python          = "master:271ce3576be25d8012af15961f827aa2235e6434"
meta-raspberrypi     = "master:693f36dded2f29fd77720f7b2e7c88ea76554466"

NOTE: Fetching uninative binary shim from http://downloads.yoctoproject.org/releases/uninative/1.9/x86_64-nativesdk-libc.tar.bz2;sha256sum=c26622a1f27dbf5b25de986b11584b5c5b2f322d9eb367f705a744f58a5561ec
Initialising tasks: 100% |##############################################################################################################################################| Time: 0:00:04
NOTE: Executing SetScene Tasks
NOTE: Executing RunQueue Tasks
NOTE: Tasks Summary: Attempted 3407 tasks of which 106 didn't need to be rerun and all succeeded.

Summary: There were 9 WARNING messages shown.
kaba@kaba-Vostro-1550:~/Desktop/yocto/build/rpi3
$

Installation and booting

If everything goes well, you can see the final image tmp/deploy/images/raspberrypi3-64/core-image-base-raspberrypi3-64.rpi-sdimg. The path is relative to your build directory - build/rpi3. It is a soft-link to your latest build image. dd it to your sd-card - /dev/sdb in my case - and boot the Raspberry Pi 3 with it.

$ sudo umount /dev/sdb*
$ sudo dd if=tmp/deploy/images/raspberrypi3-64/core-image-base-raspberrypi3-64.rpi-sdimg of=/dev/sdb bs=1M
$ sudo umount /dev/sdb*

WiFi configuration in Raspberry Pi

To access Raspberry Pi over ssh it should be part of network first. So for the first boot, connect a monitor to the board and boot with your sd-card.

Edit wpa_supplicant.conf file to input WiFi access point related information.

root@raspberrypi3-64:~# cat /etc/wpa_supplicant.conf 
ctrl_interface=/var/run/wpa_supplicant
ctrl_interface_group=0
update_config=1

network={
    ssid="Bluetooth"
    psk="**********"
}
root@raspberrypi3-64:~#
Enter your WiFi access point password against psk.

And bring-up interface wlan0 on boot-up

root@raspberrypi3-64:~# cat /etc/init.d/networking
.
.
start)
    .
    .
    ifup wlan0
    .
    .
.
.
Configure sticky IP in your access point for your Raspberry Pi corresponding to its mac. So every time after reboot you can straightaway ssh to Raspberry Pi.

References

  • [https://media.readthedocs.org/pdf/meta-raspberrypi/latest/meta-raspberrypi.pdf]
  • [http://www.jumpnowtek.com/rpi/Raspberry-Pi-Systems-with-Yocto.html]
  • [https://raspinterest.wordpress.com/2016/11/30/yocto-project-on-raspberry-pi-3/]
  • [https://stackoverflow.com/questions/35904769/what-are-the-differences-between-open-embedded-core-and-meta-openembedded]
  • [https://github.com/agherzan/meta-raspberrypi/issues/195]
  • [https://patchwork.openembedded.org/patch/36139/]

The Linux COW

In our last post we have seen how to get the physical memory address using a virtual memory address. In this post lets try to check Copy on Write(COW from here) implemented by Linux. For those who try to recollect what is COW, on fork(), Linux will not immediately replicate the address space of parent process. As the child process is most-likely to load a new binary, copying the current process's address space will be of no use in many cases. So unless a write occurs (either by the parent process or by the child process), the physical address space mapped to both processes' virtual address space will be same. Please go through Wikipedia if you still have no clue.

So lets write a C program that forks itself and check whether both are sharing the physical address space. We are going to reuse the get_paddr.c function we wrote in our previous post to get the physical memory address.

#include <stdio.h>
#include <unistd.h> /* fork() */

int main()
{
    int a;

    fork();

    printf("my pid is %d, and the address to work is 0x%lx\n", getpid(), (unsigned long)&a);
    scanf("%d\n", &a);

    return 0;
}

Execute this program in one console and while it is waiting for the user input, go to the next console and get the physical address of variable a using our get_paddr binary.

$ gcc specimen.c -o specimen
$ ./specimen
my pid is 5912, and the address to work is 0x7ffd055923e4
my pid is 5913, and the address to work is 0x7ffd055923e4
$ sudo ./get_paddr 5912 0x7ffd055923e4
getting page number of virtual address 140724693181412 of process 5912
opening pagemap /proc/5912/pagemap
moving to 274852916368
physical frame address is 0x509c9
physical address is 0x509c93e4
$
$ sudo ./get_paddr 5913 0x7ffd055923e4
getting page number of virtual address 140724693181412 of process 5913
opening pagemap /proc/5913/pagemap
moving to 274852916368
physical frame address is 0x64d2a
physical address is 0x64d2a3e4
$

OOPS! The physical address is not same! How? Why? What's wrong? As per my beloved Robert Love's Linux System Programming book, the physical memory copy will occur only when a write occurs.

{% blockquote Robert Love , Linux System Programming %} The MMU can intercept the write operation and raise an exception; the kernel, in response, will transparently create a new copy of the page for the writing process, and allow the write to continue against the new page. We call this approach *copy-on-write(COW). Effectively, processes are allowed read access to shared data, which saves space. But when a process wants to write to a shared page, it receives a unique copy of that page on fly, thereby allowing the kernel to act as if the process always had its own private copy. As copy-on write occurs on a page-by-page basis, with the technique a huge file may be efficiently shared among many processes, and the individual processes will receive unique physical pages only for those pages to which thy themselves write.

It is so clear that in our program specimen.c we never write to the only variable a unless the scanf completes. But we tested the COW before input-ing to the scanf. So by the time there would be no write and as per the design of COW physical memory space should be shared across both parent and child. Even though we have written the program carefully, sometimes the libraries, compiler and even the OS will act intelligently (stupid! They themselves says it) and fills us with surprise. So lets run the handy strace on our specimen binary to see what it actually does.

$ strace ./specimen
execve("./specimen", ["./specimen"], [/* 47 vars */]) = 0
brk(NULL)                               = 0x55de17b57000
access("/etc/ld.so.nohwcap", F_OK)      = -1 ENOENT (No such file or directory)
access("/etc/ld.so.preload", R_OK)      = -1 ENOENT (No such file or directory)
openat(AT_FDCWD, "/etc/ld.so.cache", O_RDONLY|O_CLOEXEC) = 3
fstat(3, {st_mode=S_IFREG|0644, st_size=94696, ...}) = 0
mmap(NULL, 94696, PROT_READ, MAP_PRIVATE, 3, 0) = 0x7fdbad5b8000
close(3)                                = 0
access("/etc/ld.so.nohwcap", F_OK)      = -1 ENOENT (No such file or directory)
openat(AT_FDCWD, "/lib/x86_64-linux-gnu/libc.so.6", O_RDONLY|O_CLOEXEC) = 3
read(3, "\177ELF\2\1\1\3\0\0\0\0\0\0\0\0\3\0>\0\1\0\0\0\340\22\2\0\0\0\0\0"..., 832) = 832
fstat(3, {st_mode=S_IFREG|0755, st_size=1960656, ...}) = 0
mmap(NULL, 8192, PROT_READ|PROT_WRITE, MAP_PRIVATE|MAP_ANONYMOUS, -1, 0) = 0x7fdbad5b6000
mmap(NULL, 4061792, PROT_READ|PROT_EXEC, MAP_PRIVATE|MAP_DENYWRITE, 3, 0) = 0x7fdbacfc9000
mprotect(0x7fdbad19f000, 2097152, PROT_NONE) = 0
mmap(0x7fdbad39f000, 24576, PROT_READ|PROT_WRITE, MAP_PRIVATE|MAP_FIXED|MAP_DENYWRITE,
        3, 0x1d6000) = 0x7fdbad39f000
mmap(0x7fdbad3a5000, 14944, PROT_READ|PROT_WRITE, MAP_PRIVATE|MAP_FIXED|MAP_ANONYMOUS,
        -1, 0) = 0x7fdbad3a5000
close(3)                                = 0
arch_prctl(ARCH_SET_FS, 0x7fdbad5b7500) = 0
mprotect(0x7fdbad39f000, 16384, PROT_READ) = 0
mprotect(0x55de15e94000, 4096, PROT_READ) = 0
mprotect(0x7fdbad5d0000, 4096, PROT_READ) = 0
munmap(0x7fdbad5b8000, 94696)           = 0
clone(child_stack=NULL, flags=CLONE_CHILD_CLEARTID|CLONE_CHILD_SETTID|SIGCHLD,
        child_tidptr=0x7fdbad5b77d0) = 5932
getpid()                                = 5931
fstat(1, {st_mode=S_IFCHR|0620, st_rdev=makedev(136, 2), ...}) = 0
my pid is 5932, and the address to work is 0x7fff9823b814
brk(NULL)                               = 0x55de17b57000
brk(0x55de17b78000)                     = 0x55de17b78000
write(1, "my pid is 5931, and the address "..., 58my pid is 5931, and the address
        to work is 0x7fff9823b814
) = 58
fstat(0, {st_mode=S_IFCHR|0620, st_rdev=makedev(136, 2), ...}) = 0
read(0,

As the program is waiting on scanf, it is waiting for user input in read system-call from fd 0, stdin. But the surprise part here is the clone system call. If you don't remember, read the specimen.c program once again. We never used the clone system call. And where is the fork? It seems glibc does something in a so called intelligent way. Lets read the man pages once again for pointers.

C library/kernel differences
       Since  version  2.3.3, rather than invoking the kernel's fork() system call,
       the glibc fork() wrapper that is provided as part of the NPTL threading
       implementation invokes clone(2) with flags that provide the same effect as
       the traditional system call.  (A call to fork() is equivalent to a call to
       clone(2) specifying flags as just  SIGCHLD.) The glibc wrapper invokes any
       fork handlers that have been established using pthread_atfork(3).

Doesn't look completely true. Though the man page says it calls clone() with flags as just SIGCHLD, strace uncovers the dirty truth - flags=CLONE_CHILD_CLEARTID|CLONE_CHILD_SETTID|SIGCHLD. Nobody escapes from an armed system programmer. Anyway this explains clone but no-fork surprise. But where comes the write that causes COW. See the last argument of clone() in strace, child_tidptr=0x7fdbad5b77d0 some place holder stack variable passed to be filled. And what about the two flags other than SIGCHLD? Lets go to the man pages once again, but for clone() this time.

    CLONE_CHILD_CLEARTID (since Linux 2.5.49)
        Clear (zero) the child thread ID at the location ctid in child memory when
        the child exits, and do a wakeup on the futex at that address.  The address
        involved  may be changed by the set_tid_address(2) system call.  This is
        used by threading libraries.

    CLONE_CHILD_SETTID (since Linux 2.5.49)
        Store the child thread ID at the location ctid in the child's memory.
        The store operation completes before clone() returns control to user space.

Ahh! The culprit is CLONE_CHILD_SETTID. It makes the OS to write thread ID of the child into its memory region. This write triggers the COW and gets the child a fresh copy of physical memory. Sorry Linux, I doubted you.

Okay. Lets modify our specimen with clone() and no CLONE_CHILD_SETTID flag.

/* clone() */
#define _GNU_SOURCE
#include <sched.h>

#include <stdio.h>

/* getpid() */
#include <sys/types.h>
#include <unistd.h>

#include <signal.h> /* SIGCHLD */
#include <stdlib.h> /* malloc() */

int run(void *arg)
{
    printf("my pid is %d and address to check is 0x%lx\n", getpid(), (unsigned long) arg);
    scanf("%d\n", (int *)arg);

    return 0;
}

int main()
{
    int a;
    void *stack_ptr = malloc(1024*1024);
    if (stack_ptr == NULL) {
        printf("No virtual memory available\n");
        return -1;
    }
    /*fork();*/

    clone(run, (stack_ptr + 1024*1024), CLONE_CHILD_CLEARTID|SIGCHLD, &a);
    if (a < 0)
        perror("clone failed. ");

    run(&a);

    return 0;
}

Unlike fork(), clone() doesn't start the execution of child from the point where it returns.Instead it takes a function as an argument and runs the function in child process. Here we are passing run() function which prints the pid and virtual address of the variable a. After clone() the parent also calls the function run() so that we'll get the pid of parent process.

Have you noted the second argument of clone()? It is the stack where child is going to execute. Again unlike fork(), clone() allows parent and child to share their resources like memory, signal handlers, open file descriptors, etc. As both cannot run in same stack, the parent process must allocate some space and give it to the child to use it as stack. stack grows downwards on all processors that run Linux, so the child-stack should point out to the topmost address of the memory region. That's why we are passing the end of malloced memory. Lets execute the program and see whether both process share the same physical memory space.

$ ./specimen
my pid is 3129 and address to check is 0x7fff396fdd6c
my pid is 3130 and address to check is 0x7fff396fdd6c
$ sudo ./get_paddr 3129 0x7fff396fdd6c
getting page number of virtual address 140734157020524 of process 3129
opening pagemap /proc/3129/pagemap
moving to 274871400424
physical frame address is 0x5e35a
physical address is 0x5e35ad6c
$
$ sudo ./get_paddr 3130 0x7fff396fdd6c
getting page number of virtual address 140734157020524 of process 3130
opening pagemap /proc/3130/pagemap
moving to 274871400424
physical frame address is 0x6a7cd
physical address is 0x6a7cdd6c
$

Different again! Linux can't be wrong. We should make sure we didn't mess-up anything. Are we sure there will be no write in stack after clone() call? * The child's execution starts at function run() * No variables are written until scanf() returns. Okay we'll complete our examination before providing any input. * But the functions? OOPS! After clone, parent calls run() and then printf() but child calls printf() directly. All these function calls will make write in stack which triggers COW.

Lets come-up with a different C-program with no function calls after clone() in both parent and child.

/* clone() */
#define _GNU_SOURCE
#include <sched.h>

#include <stdio.h>

/* getpid() */
#include <sys/types.h>
#include <unistd.h>

#include <signal.h> /* SIGCHLD */
#include <stdlib.h> /* malloc() */

#define STACK_LENGTH (1024*1024)

int run(void *arg)
{
    while(*(int*)arg);

    return 0;
}

int main()
{
    int a = 1;
    void *stack_ptr = malloc(STACK_LENGTH);
    if (stack_ptr == NULL) {
        printf("No virtual memory available\n");
        return -1;
    }
    /*fork();*/

    printf("my pid is %d and address to check is 0x%lx\n", getpid(), (unsigned long) &a);
    clone(run, (stack_ptr + STACK_LENGTH), CLONE_CHILD_CLEARTID|SIGCHLD, &a);
    if (a < 0)
        perror("clone failed. ");

    while (a);

    return 0;
}
We are not printing anything after clone() to avoid stack overwrite. So we have to assume the child process's pid is parent pid + 1. This assumption is true most of the times. And we use infinite while loop to pause both processes. Loops use jump statements. So they will not cause any stack write. So this time we should see same physical address has been used by both processes. Lets see.
$ ./specimen
my pid is 3436 and address to check is 0x7fffa920c1ec
$ sudo ./get_paddr 3436 0x7fffa920c1ec
getting page number of virtual address 140736030884332 of process 3436
opening pagemap /proc/3436/pagemap
moving to 274875060320
physical frame address is 0x67337
physical address is 0x673371ec
$
$ sudo ./get_paddr 3437 0x7fffa920c1ec
getting page number of virtual address 140736030884332 of process 3437
opening pagemap /proc/3437/pagemap
moving to 274875060320
physical frame address is 0x67337
physical address is 0x673371ec

GREAT! At last we conquered. We saw the evidence of our beloved COW. Now I can sleep peacefully.

For pure Engineer

Still I feel the urge to make a stack write in child process and see the physical address change. For those curious people out there who want to see the things break, lets run it one more time. Change the run() function as follows and execute specimen.c.

int run(void *arg)
{
    *(int*)arg = 10; //stack write
    while(*(int*)arg);

    return 0;
}
$ ./specimen
my pid is 3549 and address to check is 0x7ffdd8e1e9ac
$ sudo ./get_paddr 3549 0x7ffdd8e1e9ac
getting page number of virtual address 140728242137516 of process 3549
opening pagemap /proc/3549/pagemap
moving to 274859847920
physical frame address is 0x634e6
physical address is 0x634e69ac
$
$ sudo ./get_paddr 3550 0x7ffdd8e1e9ac
getting page number of virtual address 140728242137516 of process 3550
opening pagemap /proc/3550/pagemap
moving to 274859847920
physical frame address is 0x55976
physical address is 0x559769ac
$
Good Nightzzz...